
Voyager Vision Jet SF50 Beginner Guide (WIP)
Introduction
Welcome to the Voyager Aviation Vision Jet Beginner's Guide. Although this guide is tailored towards beginners, each section may serve as reminders of proper procedure and interesting tips at different stages of flight for veteran sim pilots.
Simulated aircrafts that the author knows all simulate the G2+ variants. Consequently this document only considers G2+ variants.
Flight Planning
For weight/balance and fuel initializatoin, the process is different using the flightfx version or the microsoft version. With the flightfx vision jet, you use the EFB where you select humans on board and load the fuel. With msfs2024 you use the payload in the msfs EFB, but it is a little finicky. Make sure the fuel on board matches what you expect as well as the total weight.
Aim for landing with 70 gallons on board at least.
Preflight
The preflight is quite different whether you're using flightfx vision jet or the msfs2024 default aircraft.
If you're using flightfx vision jet most of these are controlled on the EFB page:
- Remove covers.
- Remove chocks.
- Don Bose headphones.
If you're using the default msfs2024 vision jet, you do this by walking your character and clicking on various items.
- Remove covers
- Remove pitot tube covers.
- Remove chocks.
This is the moment when you welcome your very rich passengers on board. Smile and be friendly. It's also the moment where you finish loadig the fuel.
Starting The Aircraft
Flip on battery 2 switch. At this point you're supposed to check the voltage on the left display. However with only battery 2 on,currently the simulatorright doesdisplay notturns correctlyon simulateand shows the degraded display and we cannot validate thebattery voltage.
Flip on battery 1. Turn on the two generators.
AvionicsCockpit Inits
overview
Garmin 3000, also known here as Cirrus Perspective Touch has 2 large non-touch screens called GDU 1 and GDU 2. You also have 3 touch screens GTC 1 2 and 3.
On the top right side of a GTC, you can see a double rotary wheel. The larger wheel will switch the window with focus on the GDUs.
The window that has focus on the GDU is the onw with the cyan window title.

Using checklist
The checklist should automatically be loaded at this point. You need to focust the checklist using GTC 2.
Use batterythe 2large rotary knob on the middle GDU to performselect the firstchecklist initializationwindow.
The checklist control is a clickable wheel, akin to a mouse wheel. Click to toggle the checklist items, and getscroll yourto clearance.select the item.
BATthe2ONbefore ClearanceOBTAINEngineASStartREQUIREDchecklist.
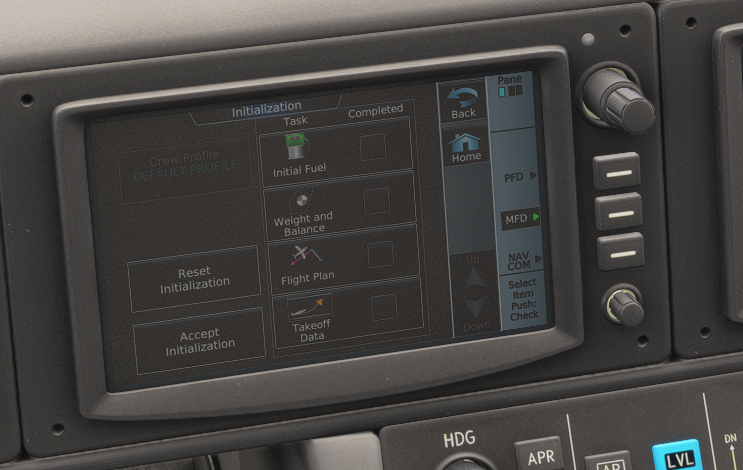
MFDAvionics
Utilities/InitializationINITIALIZEinitsPreflightGTC2testsRUNshould Fuelbe on the Initial fuel page, hit initial fuel, then FOBSYNCsync Weight(for fuel on board). Hit confirm and next. In the set empty weight and balanceCONFIGUREpage you should verify that the aircraft configured seats match the seats you have on board. Then hit back and select the aircraft loading tab, where you configure the weight on each seat.The De-ICE Qty item refers to the deicing fluid. You hould have a full tank now which is 28lbs. In the fuel tab you should tell the computer how much fuel you are likely to use during taxi.
Verify you still have 70gallons of fuel in reserve.
You can hit next and then configure the flight plan. At this point you should initialzie it either using the efb and load things from either the flight planner or simbrief.
Hit next to go to the takeoff data performance page. Various apps could give you the required take off distance. 4000 is usually more than enough.
You can hit next and accept initialization.
Trim/AP init
Now is a good time to do flight control checks.
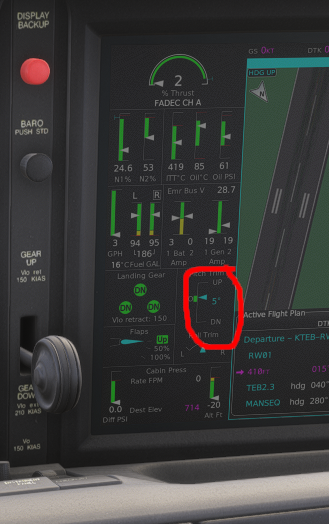
Now put the trim in the green band. You can use the trim wheel but you should really have trim up and down configured somewhere on your flight stick (the hat switch is great for that).
In real lif you shoul be able to hit the to/ga button on the throttle. This should set to/to indicators on the top of GDU1, however this does not work in MSFS2024. Then you should be able to arm the nav and flc mode on the autopilot, but the behavior of the sim here is incorrect too, so instead you should just leave these setting for now.
Set the transponder now. The GTC3 on the far right is the one you dedicate to radios usually. Use this to set xpdr. Load the frequencies you use.
Charts init
The window onthe right of the artifial horizon (where you had your checklist) is where you want your charts at this point. Select the window and hit the charts button twice. Once to load the window, the second time to select the chart.
Departure Brief
Use your voice to say out loud how you're going to taxi, take off, departure, emergency take off brief.
- Taxi brief, name the taxiways
FlightTakePlanSEToff brief, name the wind configuration the flaps setting, or anything out of the ordinary for this takeoff.
The
- Departure brief, name the haeadings and altitudes.
- Now is agreat time to load the altitudes and headings in the autopilot
XPDRSETFrom brake release to rotation for any malfunction we'll come to a complete stop on the runway.
Run

Now the emergency take off brief. I highly recommend to not skip this step as this is very specific to the vision jet and makes your simulated experiene a lot more realistic.
The vision jet has a CAPS (Cirrus Airframe Parachute System). Cirrus recommands actions around the CAPS based on the ground altitude.
| altitude (ft AGL) | action |
|---|---|
| 2000+ | Memory items, then checklists |
| 600-2000 | Immediate CAPS. Don't think, do. |
| 0-600 | NO CAPS, land straight ahead, runway or field |
Of course, using caps if there is an engine fire is silly unless you want to become a meat based firework. If fire is the issue, land asap.
Get the departure airport elevation, add 600ft, then commit the resulting altitude to memory and say it as part of the emergency brief.
Here is an emergency brief that I recommend you say out lout:
Engine Start
Turn the stobe light on. Bring back the checlist to the GDU1 screen. Check CAS messages are clear. Thrust lever all the way back. Turn the engine knob on the left ot run then hit the start button right above.
While monitoring the engine parameter, if anything goes read on the engine idicators, flip back the engine rotating knob on the left to off, and press the stop button.
while the engine indicators are moveing, do the following callouts when each needle starts moving:
- N2
- Oil pressure
- ITT
- N1
Run the engine start checklist. We already did most things. up until the EIS. Among a few thigs relate to ac it should tell you to switch on the oxygen, and pull the caps pin which are simulated on the msfs2024 vision jet (but not on flightfx version). Bleed swith set flaps.
Taxi
To make the best use of the map for taxi at this point select the map window the top right outer rotary knob of GTC2, then hit full screen. Now using the bottom rotary knob at the bottom right of GTC2 you can zoom all the way in.
Right after you start moving while taxing do a break check.
[xxx]
Before Engine Start
Run the before engine start checklist.
- Preflight InspectionCOMPLETE
- DoorLATCHED
- Parking BrakeA/R
- BAT 1 and BAT 2 SwitchesON
- GEN 1 and GEN 2 SwitchesON
- External GPU .... AS NEEDED SET 28 VDC, 800 A (MINIMUM), 1000 A (MAXIMUM)
- Verify active FADEC channel is displayed below % thrust indication.
Engine Start
Star the engine. It's a good idea to brief the callouts and the actions to take in case of bad engine starts before running the checklist. (See notes/caution below)
- Strobe LightsON
- CAS MessagesCHECK
- Thrust LeverIDLE
- BrakesHOLD
- Engine KnobRUN
- Fuel PumpCHECK
- Verify FUEL PUMP ON Advisory CAS is displayed
- Audibly confirm pump is ON
- Verify ENGINE START BAT TEMP or ENGINE START VOLTS CAS message is not displayed
Note Avoid rapidly pressing and releasing the engine button
Note Call out N2, ITT, N1 oil pressure when they come alive.
Caution At 25% N2, ensure positive N1 indication Be prepared to abort start If any of the following occur, abort start:
- ITT exceeds limits (red line)
- No N1 indication by 25% N2
- No evidence of lightoff within 8 seconds
- Low oil pressure after start
- EIS CHECKALL NORMAL
- Engine IPSA/R
- ECS Control PanelSET
- External GPUDISCONNECT
- Oxygen Master SwitchVERIFY ON
- Avionics InitializationALL INITS COMPLETE
- CAPS PinREMOVE AND STOW
- PassengersBRIEF
- Seat BeltsSECURED
- BLEED SwitchBLEED
Before Taxi
Run the before taxi checklist.
Caution If TT2 HEAT FAIL Caution occurs with Engine IPS ON, dispatch is not allowed.
Note Turn Engine IPS ON if OAT ≤ 41 °F (5 °C) with visible moisture or visibility of less than 1 mile (1.6 km).
- TrimSET
- Flaps 50%
- Electric Roll TrimSET
- TO/GA ButtonPRESS
- Pitch Attitude10°
- CAS MessagesCHECK
- Seats must be in normal upright position.
- Parking BrakeRELEASE
Departure Brief
Minimum CAPS altitude is 600ft AGL Between 600 and 2000ft AGL, immediate CAPS, above 2000, use checklist.
Before departing, brief as follows:
Departure RWxx for any malfunction make a complete stop on the runway. From rotation to xxxft MSL for an engine failure we land straight ahead, for an engine fire return to the airport and land. From xxxft yyyft MSL, for any failure we pull CAPS immediately, for fire we turnaround and land. from yyyft msl we can run the appropriate checklist.
Tip Set CAPS altitude as your minimum altitude on the perspective touch for a visual reference.
Before Takeoff
Before takeoff checklist.
- Departure BriefingCOMPLETE
- Landing LightsA/R
Caution Above 41 °F (5 °C), probe heat may only be ON for 5 minutes (continuous) during ground operations. Extended use in warmer temperatures may damage the composite structure adjacent to the pitot probe.
- PROBE HEAT SwitchON
- ENGINE IPS SwitchA/R
- Tactile ice check, make sure no ice is felt on the wings.
- WING/STAB IPS SwitchOFF
- CAS MessagesCHECK
- TrimSET
- Flaps 50%
- Verify TAKEOFF EMER BAT CAS message is not displayed.
- Multi-Function WindowsCONFIGURE
Normal Takeoff
Perform takeoff, no checlist needed, these should be all memory items, including the callouts in the notes below.
- BrakesHOLD
- Thrust LeverT/O
- Thrust Setting (N1% Indicator)ALIGNED w/ BUG (T)
- Engine InstrumentsCHECK NORMAL
- BrakesRELEASE
- VR 85 KIAS
- Pitch Attitude10°
- Landing GearUP w/ POSITIVE RATE OF CLIMB
- FlapsUP AT 115 KIAS, CLEAR OF OBSTACLES
- AirspeedPER CLIMB TABLES At 400ft AGL
- AutopilotENABLE
- AutothrottleENABLE
Note Perform callouts:
- Takeoff
- 2T
- Engine instruments
- Airspeed alive
- 90 rotate.
- Positive rate gear up
- 115knots flaps up.
- 400ft AGL autopilot available
Climb
Caution Thrust set to Takeoff thrust is limited to 5 minutes maximum. If practical, reduce to MCT within 2 minutes of selecting Takeoff thrust.
Note Due to engine deck angle limitations, the pilot should avoid operation at deck angles of 20° or greater for more than 30 seconds.
- Engine ParametersMONITOR
- Cabin PressureMONITOR
- Ice ProtectionA/R
- Altimeter Transition AltitudeSET 29.92 INCHES / 1013 MB
Cruise
- Ice ProtectionA/R
- If in RVSM Airspace and Wing/Stab IPS ON: Contact ATC and notify of non-RVSM status.
- EISMONITOR
Note: Set wing anti-ice as soon as you see any quantity of ice.
Descent Preparation
If the approach plate has altitude restrictions, the perspective touch software should display a top of descent (TOD). If it doesn't choose and set a reasonable altitude on an arbitrary point. Worst case set elevation altitude at destination.
Descent
- Landing Field ElevationCHECK
- Ice ProtectionA/R
- Altimeter Transition AltitudeLOCAL SETTING
- Seats and Seat BeltsSECURE
- Brake PressureCHECK
- Landing weightESTIMATE
- Configure Vref bug
Note The 'aircraft systems' page in the perspective touch system will tell you your Vref, computer by the sytem. Alternatively you can use the following table.
Vref Speeds (KIAS)
| FLAPS | 4000lb | 4500lb | 5000lb | 5500lb | 6000lb |
|---|---|---|---|---|---|
| Up or UNKNOWN | 89 | 96 | 100 | 104 | 109 |
| Up Ice Contaminated/STALL SPEED HIGH advisory | 115 | 122 | 128 | 135 | 140 |
| 50% | 82 | 87 | 91 | 96 | 100 |
| 50% Ice Contaminated/STALL SPEED HIGH advisory | 98 | 104 | 110 | 115 | 120 |
| 100% | 71 | 74 | 81 | 85 | 89 |
Approach
- Approach BriefingCOMPLETE
- All seats must be in normal upright position
- Ice ProtectionA/R
- LightsA/R Note: When crossing for the IAF:
- Flaps50%
- Airspeed140 KIAS
Note When cleared for the FAF or glide path intercept
- 120 knots
- flaps full
- Gear down
Before Landing
- Landing GearDOWN AND LOCKED
- FlapsA/R
- Cabin Pressure Diff~0 PSI
- WINDSHLD IPS SwitchOFF
Note IPS fluid decreases flight visibility.
- Autopilot .OFF
- Autothrottle disconnects automatically.
- AirspeedVREF TO VREF+10
- Brake PressureCHECK
At 500ft AGL:
Landing
- Flaps .... 100% (50%, IF AIRFRAME IS ICE CONTAMINATED)
- Airspeed .... VREF (REFER TO LANDING CONSIDERATIONS TABLE)
- Thrust LeverA/R After landing:
- BrakesA/R
Go Around
- Thrust LeverT/O
- TO/GA ButtonPRESS
- Pitch Attitude7°
- Flaps50%
- Landing GearUP w/ POSITIVE RATE OF CLIMB
- AirspeedVx
- FlapsUP AT 115 KIAS, CLEAR OF OBSTACLES
- Climb OutRESUME NORMAL CLIMB OUT
After Landing
- FlapsUP
- WING/STAB IPS SwitchOFF
- ENGINE IPS SwitchA/R
Caution Above 41 °F (5 °C), probe heat may only be ON for 5 minutes (continuous) during ground operations. Extended use in warmer temperatures may damage the composite structure adjacent to the pitot probe.
- PROBE HEAT SwitchOFF
- External LightsA/R
- BrakesCHECK
Shutdown
Note: Allow engine to remain at ground idle for 2 minutes (minimum) prior to shutdown for hot section component temperatures to equalize.
- Thrust LeverIDLE
- ENGINE IPS SwitchOFF
- BLEED SwitchFRESH
- OXYGEN MASTER SwitchOFF
- LightsOFF
Caution To avoid unnecessary FADEC System faults, do not remove aircraft power until N2 < 24%.
- GEN 1 and GEN 2 SwitchesOFF
- Engine KnobOFF
- Engine ButtonPRESS
- N2BELOW 24%
- CAPS PinREPLACE
- BAT 1 and BAT 2SwitchesOFF
- Parking BrakeA/R
- Egress Door PinREPLACE
- AirplaneSECURE