
Learjet - LJ35A - Beginner Guide
Introduction
This document should serve as a reasonable tutorial for the aircraft, hopefully with interesting tips along the way. It is made to look like a Standard Operating Procedure.
Tips
Altimeter
The altimeter has two knobs that you can rotate, press and long-press. the BARO knob and the ALT knob.
- Press the ALT knob to switch between thousands of hundreds of feet when rotating the knob.
- Press 1 second on the BARO knob to set the altimeter to standard pressure.
- Press 4 seconds on the BARO knob to switch between hPa/inches of Hg units.
- Press 8 seconds on the BARO knob to switch between ft to meters.
Unfortunately, in MSFS, you need to wiggle your mouse a bit to prevent the simulator to make the mouse disappear which would prevent to register a long press.
Wheel steering
The yoke of the airplane has a button that you keep pressed to engage wheel steering. This button is particualrly important At take-off. Pilots should hold this button to control yaw while accelerating until the airspeed comes alive at which point pilots release the button and use the rudder to control yaw.
With the Flysimare version of the learjet, the best is to map a button on your control to this wheel steering.
This is a little convoluted as you need to bind a 'press' event and a 'release'
event.
Choose a button on your joystick and assign a key press to G LIMITER ON.
Assign the same button to G LIMITER OFF, but on RELEASE.
Autopilot
Speed selection and Vertical Speed selection
The yoke has a switch you can move up or down to select either the speed or the vertical speed, however they're a little annoying to use in the simulator. Instead you can make sure none of the autopilot button controlling pitch are engaged, then pitch for speed. When you have the desired speed engage the SPD button on the autopilot.
Same idea works for Vertical Speed with the VS button.
Autopilot mach speed mode
The autopilot SPD button should switch between IAS and MACH mode while repeatedly pressed, but if you are simulating the Flysimware version, you need to left click and while the left button is down, right click the SPD button to enable MACH mode. You want to do that when you reach ~30k ft.
Throttle
Depending on the phase of flight you look at different numbers when tweaking the amount of throttle you select. With this plane you usually take off at 200knots. Then you climb at 250 knots setting throttle using ITT (aiming 800 degrees), at cruise you set your throttle for a fuew flow of 600lb/hr.
Fuel
Until the wings are full, there is no point in putting fuel in the tip tanks as they feed the wings by gravity. You can only feed or use gas in the trunk (rear fuselage tank) only using fuel pumps.
Normal Procedures
These procedures are designed to get you up and running efficiently while staying realistic. They describes all the steps required for a full normal flight.
Sustained Power State With GPU available
Open the door and connect the external power.
- BATT 1 & 2On
- DC VoltsConfirm 28V
Caution If all you get is 24V, the GPU is not working as it should.
- Primary InverterON
- Autopilot MasterON
- Radio AltimeterON
- Standby BatteryON
- Avionics MasterON
- Yaw Damper PRI and SECPWR
- RadarSTANDBY
- AC or HeatA/R
- Standby GyroUNCAGE
- Aux Hyd PumpON
- FlapsSet 8
- Parking BrakeSET
- Aux Hyd PumpOFF
Then remove all the exterior items Chocks, Engine Cover, Pitot Cover, Front Cover, finally Open the shades. Then set fuel on the tablet.
- ATISOBTAIN
- AltimeterSET
- ClearanceOBTAIN
- Flight PlanCONFIGURE
- XPDRSET
- Initial AltitudeSET
- Initial FrequencySET
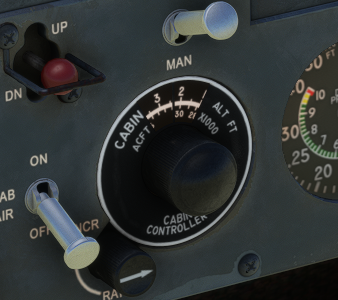
Set the cruise altitude on the cabin pressure controllercontroller:
 .
.
Take-off numbers
This is the time to load the cargo and then welcome your passengers. In the simulator this means configuring the payload in the tablet.
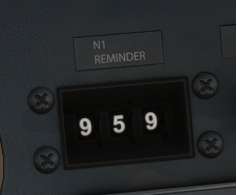
Now is the time to compute and set the speed bugs. We will determine N1, V1, Vr, V2, flap retraction and field length. Voyager recomments the use of the voyager flight computer to determine these numbers. Set the N1 on the N1 reminder and V1 and Vr as well as your departure speed restriction or 250 knots on the speed bugs.

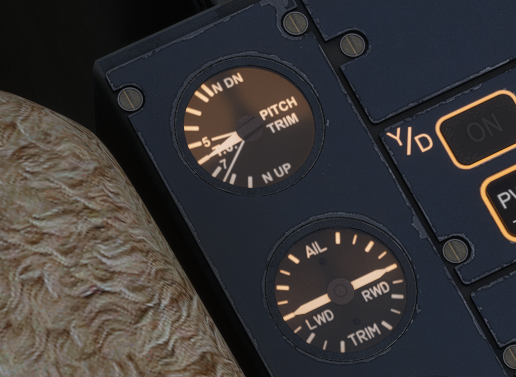
Set the pitch trim in a takeoff position according to the center of gravity value that you can get from the tablet:
Center of gravity -- %MAC
| %MAC | 5 | 8 | 12 | 16 | 20 | 24 | 28 | 30 |
|---|---|---|---|---|---|---|---|---|
| Pitch trim | 7.6 | 7.5 | 7.4 | 7.3 | 7.2 | 6.1 | 5.0 | 5.0 |

Exterior Walkaround
Run walkaround checklist.
Start
- DoorLOCKED
- BeaconON
- A/COFF
Run the before starting engine checklist.
Now it's time to start the engine. It's a good idea to brief the process before starting it because it goes quite fast.
Note In the simulator flipping from fuel cut-off to idle is achieved by clicking the latch on the throttle.


Here is a recommended briefing for voyager pilots:
First we will flip the Start/Gen switch, then verify there is a light idicating starter is on, then N1 will rise. At 13% N1 you will move the throttle from cut-off to idle. As soon as you're in idle, ITT will rise quickly. Within 10s you should see N1 rise, oil pressure coming up and 1% N2 increase per second. When the starter lights goes off at 50% N2, you can flip the Start/Gen switch to the GEN position. If at any time the ITT is approaching the redline with no sign of stopping cut-off the fuel flow and leave the starter for 15s. If the engine does not continue acceleration when the starter stops, cut-off the fuel flow and the starter. If you see no N1 rotation or no oil pressure within 10s of light-off, cut-off fuel and starter. Finally if N2 looks erratic from the start, close starter and cut-off fuel.
Light up the beacon light and start the engine 1:
- Start/Gen switchSTART
- At 13% N1 throttleIDLE Starter light goes off
- Start/Gen switchGEN
Repeat for engine 2.
Disconnect the GPU. Flip the seat belt sign, flip on the taxi lights. Run thebefore taxi checklist. Additionally click the steer lock button on the pedestal. On your way to the runway, flip the cabin air switch. Run the taxi checklist and brief takeoff.
Line-up on the runway:
- Parking Brake RELEASED
- Transponder ON
- Thrust Reversers ARM
- Pitot HeatON
- Lights (Strobe, Recognition & Landing) ON
- Stall WarningON
- Ignition ON
- Annunciator Panel NORMAL
- Cabin airCHECK ON
You should have the nose wheel steer lock on at this point. Take off you mash the nose wheel steer button of the yoke. This disables the lock, but keeps the nose wheel steering active as long as the button is pressed. You release the button at the first indication of airspeed. At this time you also call "airspeed alive".
Rotate to 15 degrees, positive rate, gear up, YD on. V2+30, flaps up. reduce throttle to keep under 200 knots.
Run the after take off checklist:
- Landing Gear (positive rate) UP
- Yaw Damper ENGAGED
- Thrust Reversers DISARM
- Flaps UP
- IgnitionOFF
- PressurizationCHECK
- Landing/Taxi LightsOFF
- Hydraulic Pressure CHECK
- Angle-of-Attack Indicators CROSS CHECK
Climb
Pitch to 250knots then engage the AP in SPD mode. Set the throttle based on ITT which you try to keep at 800 degrees.
Climb check happens at FL180
- ACOFF
- Recog lightOFF
- AltimetersSTD
- Emergency pressurization switchesNORM
- Emergency pressurization guardsCLOSED
- At FL270, you should be around Mach 0.7 then swich the AP to MACH mode and keep mach number at 0.7.
- At FL350 disable the AC
- At FL410 wear your oxygen mask.
Cruise
At cruise altitude keep power the same until you reach M0.78. Then set throttle accoring to fuel flow. Aim for 600lbs/hr.
For max-range, aim for M0.74.
If you have fuel in the fuselage tank, use fuel pumps to transfer it when when the tip tanks are empty.
Descent
30 minutes before TOD:
- Windshield heatON
Estimate landing weight and compute Vapp with the voyager flight computer.
Set the cabin controller to the field elevation.
Approach
Unless restrictions exists fly arrivals at 250kts. A few miles before IAF:
- Speed180kts
- Flaps8 Glide slope one dot above
- Flaps20
- GearDOWN
- Thurst ReverserARM
- IgnitersON
- Landing lightsON
Run the before landing checklist:
- Spoilers RETRACTED
- Flaps 8° or 20°
- Landing GearDOWN
- Landing/Taxi Lights AS REQ’D
- Anti-Skid ON, LIGHTS OUT
- Engine Sync OFF
- Thrust Reversers ARM
- Flaps DOWN & INDICATED
- Hydraulic Pressure CHECK
- Ignition ON
- AutopilotDISENGAGE
- Yaw Damper OFF DURING FLARE
Land
When crossing the FAF
- Flaps40
- Glide slopeJOIN At 500ft:
- Yaw DamperDISENGAGE
Open spoilers after landing then deploy reversers until you reach 60knots. At 45 knots engage nose wheel steering.
Run after landing checklist:
- Stall Warning OFF
- IgnitionOFF
- Thrust Reverser DISARM
- Cabin AirOFF
- Anti-Ice Systems:
- Pitot Heat & Alcohol OFF
- Defog, Windshield, Nacelle,
- Stab & Wing Heat AS REQ’D
- Lights AS DESIRED
- One Thrust Lever (Optional)CUTOFF
- Spoilers RETRACT
- Flaps UP
- Hydraulic Pressure CHECK
- Unnecessary Avionics OFF
- Transponder STBY or OFF
After taxi, run the shutdown checklist:
- Parking Brake/Chocks SET
- Anti-Ice SystemsOFF
- Emergency Lights (if installed) DISARM
- Avionics OFF
- Standby Attitude GyroCAGE
- Emergency BatteryOFF
- Thrust LeversCUTOFF
- Start-Gen SwitchesOFF
- InvertersOFF
- Fuel Transfer OFF
- Crossflow Valve CLOSED
- Beacon LightOFF
- Batteries OFF
- Controls LockINSTALL
External Links
- FlySimWare LearJet 35A for MSFS2020: Full Flight Tutorial
- The Best Classic Business Jet | Lear 35A | Early Access | MSFS
- https://www.avsim.com/forums/topic/557412-learjet-operation-explained-from-a-rw-lear-pilots-perspective