Normal Operations
Preflight
Sim setup
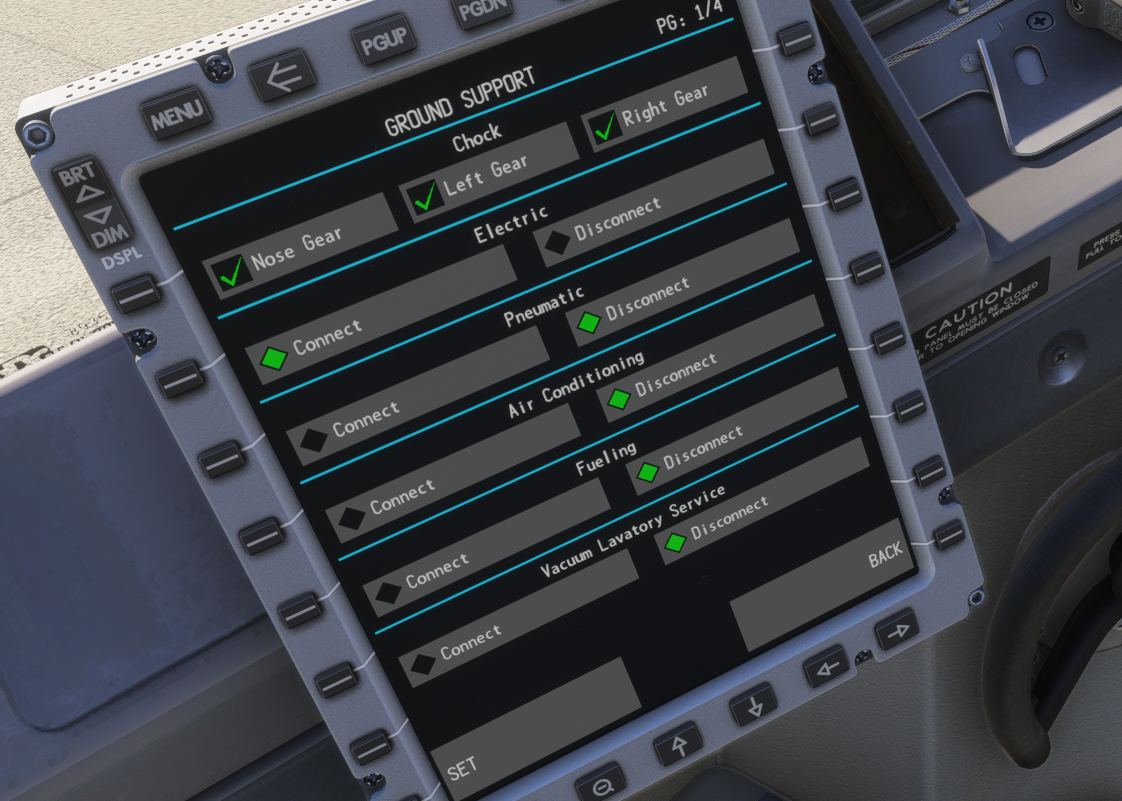
![][image1]
Start by making sure the ground electric power is connected: In the ifly in the plane’s EFB, hit power on on the top right. Then navigate to system page/sim menu/ground support electric connect and set.The UI navigation is a little unusual. Remember to use the “<=” button if you get to navigate back up to parent menus.
Check that you have metric/us system in the aircraft that matches your favorite planning software (we use simbrief, because we hate ourselves, also because we’re paying it)
![][image2]
Electric flow
Flick the cover down, to turn battery power on. With the ifly, you flick the switch and patiently wait for the cover to come down.
![][image3]
Use some for that sweet ground electric power (flick forward)
![][image4]
Enjoy the sweet hum of the various electric fans kicking in.
Safety inspection
This flow is going to be a cockpit inspection, and also minor setups before the real preflight setup.
Check that the landing leaver down, check the 3 landing lights in front of the pilot, also 3 green lights up top of the overhead panel.
Turn on electric hydraulic pumps. In theory it’s probably already on because you want pressure in the pipes while you do the walkaround to detect leaks.
![][image5]
Check the aircraft documentation up to date, because realism.
Now we check the squibs. Flick the “test” knobs left and right and make sure the right warnings and sounds are triggering. In practice I just enjoy the relaxing music of fire alarms, I believe professional pilots theck that the right lights and the master caution come on..
![][image6]
Arm the emergency exit lights.
![][image7]
If you follow this guide, your passengers haven’t boarded yet, so you don’t want to flick the passenger seat belt on at this point.
Check flaps are up (lever and display).
Do a takeoff Config warning check: Move the thrust lever all the way up. You should get a beep-beep-beep sound indicating that the plane is not configured for take off. Thrust lever back down.
Long-press the cargo fire test button, enjoy the sound of the fire alarm.
![][image8]
Squawk your squawk number.
Rainbow check
Now we perform a check that I think is called the rainbow check because it goes around and upward before coming back down.
Check manual gear extension door closed
Check circuit breakers on FO side are all in.
Check the emergency escape rope and door in case and cry that it’s not simulated because that would be so much fun to slide down from there.
Press overhead panel stall warning test 1 and 2.
Same for airspeed warning test 1 and 2
Check reverser lights are off
Check Pass oxygen off. I clicked it to try, I didn’t see masks fall down in the cabin. Immersion ruined.
Flick IRS to nav
![][image9]
Thing on heading/sts to show how many minute for the irs to sync
Check circuit breaker on capt side are in
Than you for being a safe virtual pilot: safety check is complete
Passengers and fuel
Start boarding passengers using the EFB.
Main menu /perf and payload / weight and balance. Enter all payload cargo & fuel. Hit “set” to actually load the aircraft, then complete.
![][image10]
Make sure the takeoff weight and CG look reasonable:
![][image11]
Passengers are loaded, seat belt on.
Preflight setup
Get ATIS for your current airport, in the sim, you’ll use the weather and departing runway. Set barometric pressure.
![][image12]
After you set the baro, you verify the displayed altitude matches the current airport elevation. Then set the MFRA using baro min setting to airport elevation + 1000ft. (it will be your target alt in case of eng failure, voyager aviation SOP sets it at 1000ft AGL)
![][image13]
Adjust seat. Your actual physical seat. Do it for Realism.
Check oxygen mask are working (you can click and hear a “psssht”)
Hit the light test switch and do a panel scan to validate all the button leds are working.
![][image14]
Reset master caution. From now on you should pay attention to the master caution warning. Before this point it’s not really useful.
FMC setup
Now we configure the FMC.Check airac date.
Go to pos init, hit the next page. Click the left GPS coordinates. Hit prev page. And paste to
Pos. Optionally set the current airport in the ref airport field, and validate that the coordinates are close to the ones coming from the GPS.
![][image15]
ROUTE page.. You can hit request if you set up your simbrief ID in the EFB. It takes ages to find the good page in the EFB, but you can do it. Good luck. Otherwise you can set up the route manually, it’s not hard, just a lot of virtual typing..
Put a voyager callsign in FLT NO, hit ACTIVATE. You’re not supposed to hit exec until your copilot double checked all your FMS entries. If you have no friends like myself, you can ignore this detail and click exec anytime you change something.
Configure dep/arr page. Same as in most similar FMCs.
Go to “INIT REF” page
Enter the ZFW, it should come from your company after adjusting passengers who missed the airplanes and such. For the sim, you can enter the value from the EFB or hit “ZFW” twice if you’re lazy.
Enter the cost index which was chosen by simbrief.
“Reserves” is called “FINRES+ALTN” on your LIDO OFP. You generally round up, because this setting only helps the FMC decide when you get the first warnings relative to fuel. So putting more fuel there just means an earlier warning.
![][image16]
For CRZ WIND you should enter the top of climb wind, same for the temp:
![][image17]
M means minus in this LIDO OFP.
![][image18]
Now to the LEGS page. Hit RTE DATA, then hit WINDS REQUEST. Wait patiently, then LOAD. Then exec. This sets up some wind info. I’m not sure where from, but I imagine it can’t hurt to have more data. IRL this comes from some weather system that is more serious.
Now go to “INIT REF” page, then “N1 LIMIT“. We have to configure various items that need to be computed from your performance calculator. Normal people use the EFB
![][image19]
Use “copy fmc data” to initialize most fields, complete with weather info and fill all the files until the “calculate” button becomes clickable. Then click it. Note that at this point you choose a flight setting, and see if the EFB can compute take off settings that may or may not fit the runway. If not you go back to a higher flap setting. I suspect flap 5 is almost always the used setting in real life.
Now at the bottom you can see the flaps settings, the acceleration altitude, the take of gross weight, trim settings, sel temp, D-TO setting, which I think is called “de-rate”, VREF and the V1 VR V2.
The Derate you select in the N1 LIMIT page, you also set the “sel temp” I’m not sure what that is but it’s probably important. Other stuff will have to be entered in the following page “takeoff”
![][image20]
Then go to takeoff page and set flaps
Enter CG. In the ifly the trim is computed automatically when you enter the CG and the wheel is set automatically.. I think IRL you need to turn the wheel to match the displayed setting. Enter vspeed, from EFB
Also you should set V2 on the MCP (where the autopilot controls live). This seems to be a common practice to have a visual cue that you finished computing and entering the V-speeds.
![][image21]
V-speeds, they’re important.
CG next page to set wet or dry
Rest of preflight setup
This is where most of the switch flipping happens.
Overhead
Set Yaw damper to on.
Make sure no light around the yaw damper is lit.
Fuel pumps down except center tanks if they are empty. (You can put everything down, wait a few seconds. If the center tanks stay illuminated I flip them back off. Pretty sure that’s not how real pilots do it).
![][image22]
Turn the cross fuel valve. It should turn bright then dim. Turn the cross feed back off. The light should go bright again, then off.
In the electric panel:
cabin/util on ife pass seat on. I think that's for the microwaves, the coffee heaters, and the entertainment in the back. Most important stuff.
Seat belt auto and non smocking come on.
Window heat come on
Probes remain off until later. This things get too darn hot if flipped on while on the ground.
Anti ice off for now.
Pax auto because it’s getting hot and steamy in the back. We’ll need to flip it back off before starting the engines, and before taking off if you set A/C off in the EFB when doig take of calculations. It seems folks don’t usually bother.
Cruising alt and elev destination in the pressurization setting. This is how the pressurization knows how fast/slow to pressurize the cabin while climbing or descending.
Strobe lights steady, anti collision lights on
Setup the MCP
Flight directors (left first, MA should display for master, then right, no master here)
Enter cleared altitude
Runway heading
Setup the EFIS
Almost there
Set the takeoff page on pilot flying FMC, LEGS page on pilot monitoring FMC
Check your trims again for good measure. Set navaids/radios, check the transponder, check aileron trims.
Preflight setup complete!
Pushback/Taxi
Briefs taxi TO and sid
Here you do a sanity check. Or don’t, but don’t come complaining if simbrief loaded the wrong flightplan. PROG page: check that ground distance matches with plan.
![][image23]
![][image24]
Second sanity check, fuel on arrival should match reserves
Cross Check instruments with copilot
- Time
- MFRA
- QNH
- FD
Brief takeoff
Say the airplane model, for realism. “737 max, runway 34R dry without anti ice and flaps 5, in case of engine failure climb to 1400.”
Complete taxi routing brief: “We’re taking off runway 34R, push back to the left to face south, then likely taxi via W”
Brief the SID:
Plan on the EFIS and go to the LEGS page then step through and compare to your charts.
Check stop alt in particular.
Checks complete, ready for pushback
Pushback
Finally some fuel burning up in here. Turn the APU on.
Once apu gen illuminated, put them on the bus and disconnect ground power and remove chocks.
![][image25]
Get your pushback clearance, Set bleed on. Pax off.
Xpdr to alt off and auto
Engine 2 to ground
Watch N1, N2 then motoring is displayed.This is a thing to straighten a motorshaft Wait a little longer.
![][image26]
When N2 richest 25 you introduce fuel.
Make sure EGT does not go over the red bug
Start again engine number 1
Before Taxi flow
We are almost moving on our own. So exciting. The taxi flow is easy:
Flip Engine gens on
Apu gens off
Apu off
Start switches to cont
Probe heat on
Anti ice on if req’d
Pax to auto isolation valve to auto
Apu bleed is off
Flaps to 5
Flight control check
Push recall.
Get rid of the engine details:
![][image27]
Run before taxi checklist
Taxi
Set turnoff and taxi light
Release parking brake
Thrust fully forward and back to idle to check for no beep beep beep.
Typically enough thrust at idle to taxi, so no need to gun it.
Try to go at 10 knots of less when turning 90 degs or more. Or tokyo drift your way to the runway.
While rolling on a taxi way you do the before take off checklist.
Config check if not done
Check flaps in CDU and set
Check Stablizier trim
Check Pax auto
Check Bleeds off
Check V speeds are set
Brief review of departure
Push the attend button to make sure cabin is ready
No smoking switch
Take off/climb
Take-off
When cleared for line up or take off. Let your inner child be excited. You deserve it.
Landing lights come on.
Strobe (flick backwards theposition/strobe light)
Auto throttle set (!)
LNAV pressed.
Weather radar on for capt.
Transponder to TA/RA
Now line up PERFECTLY on the runway centerline. I’ll be watching.
Start timer (I never look at it afterwards but I heard it’s important)
Thrust to 40% while the aircraft accelerates watch the engine metrics stabilize. When stabilized, hit TOGA (on thrust lever, or the click spot on the screw here:)
![][image28]
Forward yoke pressure until 80 kts where you release.
Gently pull to fd at VR.
Say with you coolest pilot voice “Positive rate gear up”
1000ft agl you could engage ap but don’t.Hand fly this bad boy a bit will you? Trim as req’d
Once above the white bug select flaps1
Above 1 bug select flaps up
Run the After take off checklist
Check gears up
Auto brake comes off
Starter switch can come off (from cont)
Check temperature for eng anti ice
![][image29]
Check AC/pressurization. If you don’t have differential pressure, someone left a door open. That person is getting fired.
Release cabin crew by hitting attend.
Std When going to flight level
FL100 pre cruise checks
Landing turnoff and taxi lights off
Apu should be off, if running you need to do a special checklist, but you dind’t forget did you?
Pressurization verified
Recall
Seat belt sign to auto
Cleared to final cruise altitude, check cruise alt 3 times: MCP, overhead panel
VNAV Climb page
Cruise
At Fl300 set bank to 10.
When you reach final cruise altitude you could set the MCP N1 limit: “CON”
![][image30]
Check pressure again. Protip: At this point a good indication that the pressure system is indeed working is the fact that you’re alive and breathing.
Cruise and descent prep
Descent prep
100 miles from TOD or so, get you act together, prep you descent.
Get the destination ATIS.
Fill descent forecast in FMC from FMC VNAV/ECON DES page, then forecast get winds
Get destination weather preset QNH
![][image31]
Choose your runway and approach, set in the FMC.
In fix page enter RWxx
Then /10 and /4 in the lines below. You should be at flaps 5 before /10 and flaps 15 gear down before /4. At least.
Also altitude in flight levels times 3 in the fix page (/xxx) to know cheap top of descent.
Check chart, enter ILS freq and course.
Brief the approach chart. Also brief missed approach,because you’re not that good.
Brief arrival potentially setting a lower speed in the legs page near the base leg to make your life easier.
Figure out our landing weight:
In progress page, check fuel at landing time, and current fuel
![][image32]
Use math to know how much you will burn. (current fuel - estimated fuel at arrival)
Go to INIT REF page with that info, subtract the calculated burned fuel to your gross weight.
Armed with that weight lets see how long of a runway we need:
Use perf calculator in the EFB:
![][image33]
It gets you there:
![][image34]
“COPY FMC DATA” Set the AC settings and flaps 30
Set flap/spd to 30, it’s almost always 30.
Set autobrake guess 2, then adjust if the landing length calculated is too long for your runway.
Brief where you’re going to vacate the runway.
Descent
You can set a lower altitude on the CDU, and the aircraft will start descending on its own at ToD (when in VNAV)
If you get the message “reset mcp altitude” on your FMC, it means you’re getting close to your top of descent. Confirm with atc and set altitude
I should tell you to run the descent checklist at this point. Did you set the minimum and the qnh? I bet you did.
If the computer tells you “DRAG REQUIRED” you pull the airbrakes. (I know, shocker)
- At Fl300 set bank to 30
- At FL200 check pressurization. If icing condition: current or expected too, ignition to continuous and engine anti ice on.
- At 15k seat belt sign on
Post cruise check
Around 10k you get ready for show time
Check fuel fuel pumps on
Landing and turnoff lights come on
Taxi lights you leave off, you turn them on when we have landing clearance, serves as a visual reminder.
Angle of bank set to 25
Pressurization check again, we should have close to no differential pressure.
Recall
Anti ice a/r
Approach checklist, in particular:
Check ILS frequency
Check you set your rings
Check identifier for ils check
Check course
App. checklist complete
Before you reach the 10 ring, it’s a good idea to control the speed using the “SPD INTV” button and start slowing down. You should do that around what looks like your “base leg”.
Approaching your 10 ring, you set speed and flap to 1. Each time you touch your flap, you reduce your speed on the CDU to the matching number.
IMC 5 miles, VMC 4 miles gear down and flaps 15
Run the landing checklist
Start switches to cont
Recall
Speedbrake arm
Landing gear down
Autobrake set
2 mile final, set landing flaps as per you EFB calculation
Your speed should now be at Vref + steady headwind component
Landing
- Disc at/ap I used the CDU to disconnect A/T. I don’t think that’s legit.
- 30 start flare
- 20 close thrust
Reversers stay until 60kts
Cleanup flow
Wx off
Flip landing lights to off, speed brake off, Xpdr off
Flaps up
Trim to 4
autoBrake off
Flight directors off
Speed on CDU set to 100
Altitude on CDU set to 4100
Stobe off
Probe off
Start apu
Taxi
Get taxi clearance
Turnoff taxi light on
3mins after landing turn down engine 2
(eng can be turnd off 1 on stand)
Parking brake
Shut down flow
Seat belt sign to off
Advise cabin crew to open doors and disarm slides
Monitor n2 reduction below 20% anti collision light can come off
Turn off window heat, elec pump
Xpdr goes stdby
Run the shutdown checklist
Secure checklist
Ils off pax off
Trim air off
Emer lights off
Apu off
when passengers are out,
Gpu and battery off